


If you’ve ever installed a popular multi-purpose WordPress theme only to be greeted by a bloated dashboard, sluggish load times, and 500 features you will never use, you aren’t alone.
Building a custom WordPress theme from scratch used to sound like dark magic reserved for senior developers. Today, thanks to modern tools and WordPress’s block-friendly architecture, creating a lean, fast, custom theme is the best way to gain total control over your website’s performance.
In this tutorial, we will bypass the bloat and build a functional, lightweight WordPress theme from the ground up.
Prerequisites: What You Need Before We Start
Before touching any code, you need a safe place to build. Never develop a new theme on a live website.
- A Local Server Environment: Download and install LocalWP (my personal favorite for speed) or XAMPP.
- A Code Editor: VS Code is the industry standard.
- Basic Knowledge: You should be comfortable reading basic HTML, CSS, and a little bit of PHP.
Step 1: Create the Essential File Structure
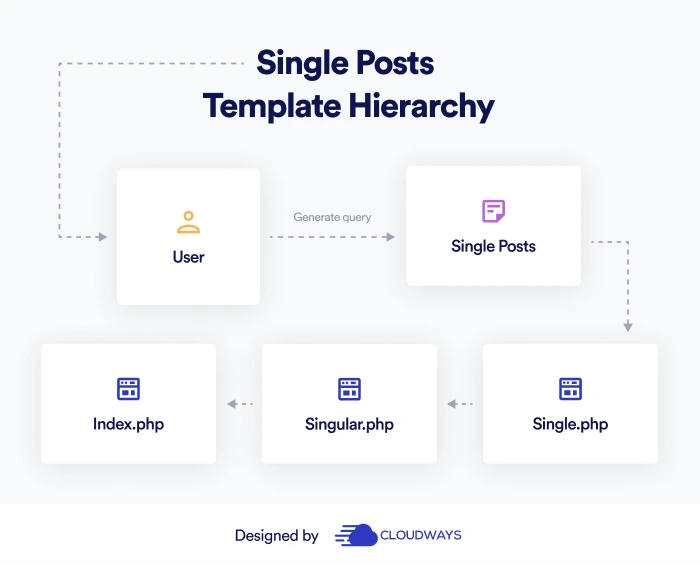
WordPress is famously strict about its template hierarchy. However, at its absolute core, a WordPress theme only requires two files to function.
Navigate to your local WordPress installation folder: wp-content/themes/. Create a new folder and name it something unique, like my-custom-theme.
Inside that folder, create these two files:
style.cssindex.php
Setting Up the Stylesheet
Open style.css. This file does more than just hold your design; it tells WordPress that your theme exists. Paste the following header comment at the top of the file:
/*
Theme Name: My Custom Theme
Theme URI: https://yourwebsite.com
Author: Your Name
Author URI: https://yourwebsite.com
Description: A lightweight, custom-built WordPress theme.
Version: 1.0
License: GNU General Public License v2 or later
License URI: http://www.gnu.org/licenses/gpl-2.0.html
Text Domain: my-custom-theme
*/

body {
    font-family: 'Inter', sans-serif;
    margin: 0;
    padding: 0;
    background-color: #f4f4f9;
}
If you go to your WordPress Dashboard under Appearance > Themes, you will now see your theme available to activate. Go ahead and activate it. Your site will be completely blank—let’s fix that.
Step 2: Breaking Down the Header and Footer
A good developer keeps their code dry (Don’t Repeat Yourself). Instead of pasting the <head> and navigation HTML into every single page, we separate them.
Create two new files in your theme folder: header.php and footer.php.
In header.php, add:
<!DOCTYPE html>
<html <?php language_attributes(); ?>>
<head>
    <meta charset="<?php bloginfo('charset'); ?>">
    <meta name="viewport" content="width=device-width, initial-scale=1">
    <?php wp_head(); ?> <!-- Critical: Allows plugins to load scripts -->
</head>
<body <?php body_class(); ?>>
    <header class="site-header">
        <h1><a href="<?php echo esc_url(home_url('/')); ?>"><?php bloginfo('name'); ?></a></h1>
        <p><?php bloginfo('description'); ?></p>
    </header>
In footer.php, add:
    <footer class="site-footer">
        <p>© <?php echo date('Y'); ?> <?php bloginfo('name'); ?>. All rights reserved.</p>
    </footer>
    <?php wp_footer(); ?> <!-- Critical: Allows plugins to load footer scripts -->
</body>
</html>
Developer Note: Never forget
wp_head();andwp_footer();. The first time I built a theme, I left these out, and I spent three hours trying to figure out why absolutely none of my plugins were working.
Step 3: The WordPress Loop
Now we need to actually display your blog posts. Open your index.php file. This is the fallback file that WordPress uses to render content if no specific template (like single.php or page.php) exists.
We will call the header, run the WordPress Loop to fetch posts, and call the footer.
<?php get_header(); ?>

<main class="site-main">
    <?php
    if ( have_posts() ) :
        while ( have_posts() ) : the_post(); ?>

            <article class="post">
                <h2><a href="<?php the_permalink(); ?>"><?php the_title(); ?></a></h2>
                <div class="post-meta">
                    Published on <?php the_time('F j, Y'); ?> by <?php the_author(); ?>
                </div>
                <div class="post-content">
                    <?php the_excerpt(); ?>
                </div>
            </article>

        <?php endwhile;
    else :
        echo '<p>No content found</p>';
    endif;
    ?>
</main>

<?php get_footer(); ?>
Step 4: Enqueueing Scripts and Styles Properly
You might notice your theme still looks like plain HTML, even if you wrote CSS in style.css. That’s because we haven’t told WordPress to load the stylesheet.
Do not hardcode <link rel="stylesheet"> in your header. The correct WordPress method is to enqueue it.
Create a file named functions.php and add this code:
<?php
function my_custom_theme_scripts() {
    // Load the main stylesheet
    wp_enqueue_style( 'main-style', get_stylesheet_uri(), array(), '1.0', 'all' );
}
add_action( 'wp_enqueue_scripts', 'my_custom_theme_scripts' );
?>
Refresh your browser. Your styles will now apply, and you officially have a working, custom-built WordPress theme.
Next Steps for Production
This is the barebones foundation. To take this theme to a production-ready state, you will want to add:
single.phpfor formatting individual blog posts.page.phpfor static pages.- Theme support for featured images (
add_theme_support('post-thumbnails');).
Building your own theme requires patience, but the payoff is a lightning-fast website that ranks better on Google and is entirely immune to the bloated code of commercial themes.
